# VSCode
The following shows the steps for building a bundle using Visual Studio Code (VSCode). Please note that the instructions show a Win10 system but should be similar for macOS/Linux. This guide assumes you have a base development directory already defined (example: c:/users/me/development) and will reference that directory as %BASE%.
# One time setup
The following steps will only need to be done once to setup both VSCode and your environment.
Install Java Extension Pack for VSCode (https://marketplace.visualstudio.com/items?itemName=vscjava.vscode-java-pack (opens new window))
Clone the addons (https://github.com/openhab/openhab-addons.git (opens new window) or preferably your own fork) to %BASE%\openhab-addons
On Windows, VSCode should be configured to use powershell instead of the classic command line.
If not configured already, add the following to the VSCode settings:
"terminal.integrated.automationShell.windows": "C:\\Windows\\sysnative\\WindowsPowerShell\\v1.0\\powershell.exe"Either globally define the options via the global
settings.json. You can also define them local to a specific bundle by putting those lines in the.vscode/settings.jsonfile in the bundle (similar totasks.json/launch.jsonbelow).If you want to setup openHAB code formatting guidelines, add the following to the VSCode settings:

Either globally define the formatting options via
Files->Preferences->Settings->Extensions->Java configuration(or in the globalsettings.json). You can also define them local to a specific bundle by putting those lines in the.vscode/settings.jsonfile in the bundle (similar totasks.json/launch.jsonbelow).
Download settings.json (opens new window) for the recommended settings (or simply wish to copy the URLs in the above image).
# Steps for each Bundle
The following steps will show you how to setup a specific bundle for development with VSCode. These steps will show how to setup the Russound bundle but are generic to any bundle in the system.
Ensure the bundle builds correctly (natively with Maven)
- Open console to the bundle location (example:
%BASE%/openhab-addons/bundles/org.openhab.binding.russound) mvn clean install -DskipChecksin the console to build the bundle- Should produce a jar file in the 'target' directory of the bundle(example:
%BASE%/openhab-addons/bundles/org.openhab.binding.russound/target/org.openhab.binding.russound-5.0.0-SNAPSHOT.jar)
- Open console to the bundle location (example:
Open VSCode and then open the folder of the bundle. From VSCode - use
File->Open Folder->choose bundle directory(example:%BASE%/openhab-addons/bundles/org.openhab.binding.russound)Create a ".vscode" directory under the bundle (example:
%BASE%/openhab-addons/bundles/org.openhab.binding.russound/.vscode)
Download tasks.json (opens new window) to the .vscode directory (example:
%BASE%/openhab-addons/bundles/org.openhab.binding.russound/.vscode/tasks.json)
Edit tasks.json and ...
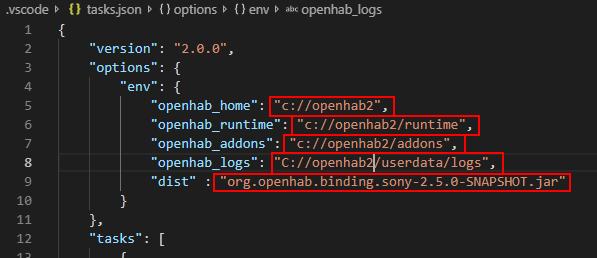
- Set
openhab_*to the directories for your openHAB installation - Set
distto the name of the JAR file Maven is producing in the target directory - Save and close tasks.json
- Set
Stop any openHAB instance (if it's running).
Start the openHAB instance with the debug option -
start.bat debugfrom a console in the openHAB home directory. You should see the following line printed somewhere in the karaf console:Listening for transport dt_socket at address: xxxx(where xxxx should be 5005)Download launch.json (opens new window) to the .vscode directory (example:
%BASE%/openhab-addons/bundles/org.openhab.binding.russound/.vscode/launch.json)
Edit launch.json and ...

- Set the
portto xxxx (from step 7). This can be skipped if xxxx was 5005 from step 7. - Set the
hostNameto the hostname running openHAB. This can be skipped if running locally (localhost) - Save and close launch.json
- Set the
Verify that VSCode can build the system and connect to a debug instance of openHAB:
- Shutdown any instances of openHAB
- Press
CTRL-SHIFT-P -> Tasks: Run Task -> Start openHAB (Debug)to start an openHAB instance in debug mode. You should see openHAB startup in a new VSCode terminal. - Press F5 (or bring up debug in VSCode and choose the "Debug (Attach) - openHAB" configuration) and the following should occur in the VSCode terminal
- The Maven compile occurring (successfully)
- The resulting JAR is copied to the openHAB addons directory (
openhab_addons) - Connecting to the openHAB instance (the debug call stack should show a bunch of openHAB type threads running)
You can now make changes, set breakpoints, etc.
# Notes
- May take openHAB a few seconds to realize there is a new bundle and to reinitialize it after it's been copied. Be a little bit patient.
- You must run the
mvn Compile (Online)task at least once to allow the offline compile to occur. You should use themvn Compile (Offline)task for most of your development as it's quicker since it uses the cache files. When you are ready to commit (or release a test bundle) - you should run themvn Compile (Release)task to include code checks (and resolve them). - Win10+ allows forward slashes as part of its path. If you use backward slashes instead - you will need to double up on them since tasks.json uses a backward slash as a delimiter. Example:
c:\\\\openhab
# Tasks
The tasks.json defines the following tasks that you may use withing VSCode (CTRL-SHIFT-P > Tasks: Run Task):
- Start openHAB (Debug) - this task will start a new instance of openHAB in debug mode (allowing VSCode to connect to it). Please shut down any other instances of openHAB prior to running this (see next task). This will open a new terminal for openHAB to run in. Formally, this will call
start.bat debug(orstart.sh debugon macOS/Linux) in theopenhab_homedirectory. - Stop openHAB - this task will stop any running instance. Please note this will stop an instance started outside of VSCode as well on the same machine. Formally, this will call
stop.bat(orstop.shon macOS/Linux) in theopenhab_runtime/bindirectory. - mvn Compile (Online) - this task will run an online Maven compile skipping code checks. Formally, will run
mvn clean install -DskipChecks - mvn Compile (Offline) - this task will run an offline Maven compile skipping code checks (assumes you have run an online compile at least once). Formally, will run
mvn -o clean install -DskipChecks - mvn Compile (Release) - this task will run an online Maven compile with code checks. Formally, will run
mvn clean install - Copy Distribution to Addons - this task will run the 'mvn Compile (Offline)' task and then copy the resulting target file (as defined by
dist) to your openHAB addons directory (defined byopenhab_addons) - Build - this is an alias for
Copy Distribution to Addonstask. - Tail events.log - this will tail the events.log in a new terminal.
- Tail openhab.log - this will tail the openhab.log in a new terminal.