# Linky Binding

This binding enables the exploitation of electricity consumption data, mainly for the French market. It supports different functionalities:
- Connection to Enedis to retrieve consumption data online.
- Connection to the RTE API to get Tempo Red/White/Blue calendar information.
# Migration
The new binding (as of openHAB 5.0.0) will need some tweaks to your configuration to work. Mainly the new binding uses Bridge to access Enedis data, so you will have to add this bridge to your configuration. Step are:
before updating to openHAB 5.0, in case you defined your Thing with Main UI, backup username, password & internalAuthId configuration parameters as you will need to fill them again.
add a bridge definition
Bridge linky:enedis:local "EnedisWebBridge" [
    username="myUserName@myDomain.com",
    password="MyPassword",
    internalAuthId="zeJhbGciOiJBMTIdaqzerZiLCJlbmMiOiJBMTIcwxdsq..."] {
   }
Move username, password and internalAuthId configuration parameters from the old linky Thing to the bridge Thing.
Link your old Thing to the new created bridge Thing:
Thing linky:linky:linkremotexxxx "Linky xxxx" (linky:enedis:local)Start using the new channels added by the enhanced binding.. Old items will work out of the box without the need to relink items to channels.
# Getting Consumption Data Online
The new binding version can use multiple bridges to access consumption data. You can use :
- The enedis bridge: Uses the old Enedis API, based on the Enedis website, to gather data.
- The myelectricaldata bridge: Uses the new REST Enedis API via the MyElectricalData proxy site to access the data.
- The enedis-api bridge: Also uses the new REST Enedis API, but gathers data directly from the Enedis site.
You first need to create an account at the Enedis website (opens new window) if you don't already have one. Ensure that you have accepted their conditions and check that you can see graphs on the website, especially the hourly view. Enedis may require your permission the first time to start collecting hourly data.
The binding will not provide this information unless this step is completed.
Advantage and Disadvantage of Each Method.
- Enedis bridge is the older method.
- MyelectricalData and enedis bridges both use the new API format, making them less prone to changes in website architecture.
- MyelectricalData bridge is managed by a third-party provider but is stable.
- Enedis-api bridge directly connects to Enedis but currently requires a complex registration process with Enedis. This limitation will likely be resolved in the near future, making Enedis-api Bridge the preferred method.
Be warned that MyElectricalData bridge collect data using MyElectricalData service. This service will store your enedis information for caching purpose. This cache is crypted, so it may be a very big concerns, but of course, we don't know the details about this crypting, and if it can be reverse to access your data.
# Bridge Configuration
To retrieve data, the Linky device needs to be linked to a LinkyBridge. The available bridge options are enedis, myelectricaldata, and enedis-api.
# Enedis Web Bridge
If you select enedis web bridge, you will need:
To create an Enedis account: https://mon-compte-client.enedis.fr/ (opens new window)
To provide your credentials: username, password, and InternalAuthId.
Parameter Description username Your Enedis platform username. password Your Enedis platform password. internalAuthId The internal authentication ID. This version is compatible with the latest Enedis Web API (deployed from June 2020). To bypass the captcha login, log in via a standard browser (e.g., Chrome, Firefox) and retrieve the user cookies (internalAuthId).
Instructions for Firefox :
- Go to https://mon-compte-client.enedis.fr/ (opens new window).
- Select "Particulier" from the drop down and click "Connexion".
- Enter your Enedis account email and check "Je ne suis pas un robot".
- Click "Suivant".
- Enter your Enedis password and click "Connexion à Espace Client Enedis".
- Navigate to your Enedis account environment, then return to the previous page in your browser.
- Log out from your Enedis account.
- Repeat steps 1-2. This time, open the developer tools window (F12) and select the "Storage" tab.
- Under "Cookies", select
https://mon-compte-client.enedis.fr/. Locate the "internalAuthId" entry and copy its value into your OpenHAB configuration.
A new timezone parameter has been introduced. If you don't put a value, it will default to the timezone of your openHAB installation. This parameter can be useful if you read data from a Linky in a different timezone.
Bridge linky:enedis:local "EnedisWebBridge" [ username="example@domaine.fr", password="******", internalAuthId="******" ]
# Myelectricaldata Bridge
If you select MyElectricalData bridge, you will need :
To create an Enedis account: https://mon-compte-client.enedis.fr/ (opens new window)
To follow these steps to initialize the token:
You can access the procedure from the connectlinky page available from your openHAB: https://home.myopenhab.org/connectlinky/index (opens new window).
You will find screenshot of the procedure in the following directory doc/myelectricaldata/
- Go to the connectlinky page on OpenHAB.
- Follow the first two steps of the wizard and click "Access Enedis".
- Log into your Enedis account.
- Authorize data collection for your PRM ID. If you have multiple Linky meters, repeat the procedure for each one separately; selecting multiple meters at once will not work.
- You will then be redirect to a confirmation page on MyElectricalData web site
- Return to OpenHAB, go to "connectlinky/myelectricaldata-step3", select your PRM ID from the dropdown, and click "Retrieve Token".
- A confirmation page will appear if everything is correctly set up.
Bridge linky:my-electrical-data:local "MyElectricalBridge" [ ]
# Enedis Bridge
If you select enedis bridge, you will need:
To create an Enedis account: https://mon-compte-client.enedis.fr/ (opens new window)
Follow these steps to initialize the token. You can access the procedure from the connectlinky page available from your openHAB: https://home.myopenhab.org/connectlinky/index (opens new window).
You will find a screenshot of the procedure in the following directory doc/enedis/
- Go to the connectlinky page on OpenHAB.
- Follow the first two steps of the wizard and click "Access Enedis".
- Log into your Enedis account.
- Authorize data collection for your PRM ID.
- A confirmation page will appear if everything is correctly set up.
Bridge linky:enedis-api:localSB "EnedisBridgeSandbox" [ clientId="myClientId...", clientSecret="myClientSecret..."]
# Thing Configuration
The remote bridge works with Linky devices to retrieve consumption data from a remote API or website.
You can have multiple Linky devices in your setup if you have different houses or multiple Linky meters linked to your account. To do this, simply create multiple Linky devices and set the prmId to match your meter ID. You can find the meter ID on the Enedis website or directly on your Linky meter.
You can switch the Linky device from one bridge to another if you experience issues with a particular bridge. The data retrieved will be almost identical regardless of the bridge you use. Only a few contract-related items may differ between the web bridge and the API bridge.
The device has the following configuration parameters:
| Parameter | Description |
|---|---|
| prmId | The prmId linked to the Linky Handler (optional: if blank first registered meter will be used |
| timezone | The timezone associated with your Point of delivery |
| token | Optional: Required if a token is necessary to access this Linky device (used for MyElectricalData). |
Thing linky:linky:linkyremote "Linky Remote" (linky:enedis:local) [ ]
Thing linky:linky:linkyremotexxxx "Linky Remote xxxx" (linky:enedis:local) [ prmId="xxxx" ]
Thing linky:linky:linkyremotexxxx "Linky Remote xxxx" (linky:enedis-api:local) [ prmId="xxxx" ]
Thing linky:linky:linkyremotexxxx "Linky Remote xxxx" (linky:myelectricaldata:local) [ prmId="xxxx", token="myElectricalDataToken" ]
# Thing Channels
The retrieved information is available in multiple groups.
The daily group will give consumtion information with day granularity
Channel ID Item Type Description daily#yesterday consumption Yesterday energy usage daily#day-2 consumption Day-2 energy usage daily#day-3 consumption Day-3 energy usage daily#consumption consumption timeseries for energy usage (up to three years will be store if available) daily#maw-power power timeseries for max-power usage daily#power power Yesterday's peak power usage daily#timestamp timestamp Timestamp of the power peak daily#power-2 power Day-2's peak power usage daily#timestamp-2 timestamp Timestamp Day-2's of the power peak daily#power-3 power Day-3's peak power usage daily#timestamp-3 timestamp Timestamp Day-3's of the power peak The weekly group will give consumtion information with week granularity
Channel ID Item Type Description weekly#thisWeek consumption Current week energy usage weekly#lastWeek consumption Last week energy usage weekly#week-2 consumption Week -2 energy usage weekly#consumption consumption timeseries for weeks energy usage weekly#max-power power timeseries for max-power weekly usage The monthly group will give consumtion information with month granularity
Channel ID Item Type Description monthly#thisMonth consumption Current month energy usage monthly#lastMonth consumption Last month energy usage monthly#month-2 consumption Month-2 energy usage monthly#consumption consumption timeseries for months energy usage monthly#max-power power timeseries for max-power monthly usage The yearly group will give consumtion information with year granularity
Channel ID Item Type Description yearly#thisYear consumption Current year energy usage yearly#lastYear consumption Last year energy usage yearly#year-2 consumption year-2 energy usage yearly#consumption consumption timeseries for years energy usage yearly#max-power power timeseries for max-power yearly usage The load-curve group will give you access to load curve data with granularity as low as 30mn
Channel ID Item Type Description load-curve#power power The load curve data You will also find some Information as properties on the linky things
Channel ID Description identitiy The full name of the contract older customerId The internal Enedis customer ID contractSubscribedPower The subscribed max Power contractLastActivationdate The contract activation date contractDistributionTariff The current applied tarif contractOffpeakHours The OffPeakHour link to your contract contractStatus The current contract status contractType The contract type contractLastdistributionTariffChangedate The date of the last tariff change contractSegment The customer segment for this contract usagePointId The distribution / usage point uniq indentifier usagePointStatus The usage point current state usagePointMeterType The usage point meter type usagePointCity The usage point City usagePointCountry The usage point Country usagePointPostalCode The usage point Postal Code usagePointStreet The usage point Address Street contactMail The usage point Contact Mail contactPhone The usage point Contact Phone
# Dynamic Thing Channels
The binding (as of openHAB 5.1.0) supports reading consumption indexes from the Enedis website.
This makes it possible to view consumption for different tariffs such as heures pleines / heures creuses or tempo.
To handle this, binding will create a new set of channels for daily, weekly, monthly, and yearly groups.
You will have two different sets of indexes:
Raw consumption indexes:
These are the default indexes returned by Enedis. The naming uses base indexes, so there is no direct way to know which tariff each index corresponds to.
Channels will be named as follows:consumptionSupplierIdx0, consumptionSupplierIdx1, ..., consumptionSupplierIdx9 consumptionDistributorIdx0, consumptionDistributorIdx1, ..., consumptionDistributorIdx3
In France, the distributor is most often Enedis — they are responsible for distributing electricity on your network.
The supplier is the commercial company with which you have a contract (EDF, TotalEnergies, etc.). This is where your specific supplier tariff is defined.Named consumption indexes:
To make things simpler, the binding also exposes tariff-named channels.
For example:daily#heuresPleines, daily#heuresCreuses, daily#bleuHeuresCreuses, daily#bleuHeuresPleines, daily#redHeuresCreuses, ...
⚠️ Warning:
Dynamic channels and indexes are currently only supported with the EnedisWebBridge.
Support for other bridges will be introduced later, once Enedis provides an API to access this data.
# Full Example
# Remote Enedis Web Connection
Bridge linky:enedis:local "EnedisWebBridge" [ username="example@domaine.fr", password="******", internalAuthId="******" ]

Thing linky:linky:linkyremotexxxx "Linky Remote xxxx" (linky:enedis:local) [ prmId="xxxx" ]
Number:Energy ConsoHier "Conso hier [%.0f %unit%]" <energy> { channel="linky:linky:linkyremotexxxx:daily#yesterday" }
Number:Energy ConsoSemaineEnCours "Conso cette semaine [%.0f %unit%]" <energy> { channel="linky:linky:linkyremotexxxx:weekly#thisWeek" }
Number:Energy ConsoSemaineDerniere "Conso semaine dernière [%.0f %unit%]" <energy> { channel="linky:linky:linkyremotexxxx:weekly#lastWeek" }
Number:Energy ConsoMoisEnCours "Conso ce mois [%.0f %unit%]" <energy> { channel="linky:linky:linkyremotexxxx:monthly#thisMonth" }
Number:Energy ConsoMoisDernier "Conso mois dernier [%.0f %unit%]" <energy> { channel="linky:linky:linkyremotexxxx:monthly#lastMonth" }
Number:Energy ConsoAnneeEnCours "Conso cette année [%.0f %unit%]" <energy> { channel="linky:linky:linkyremotexxxx:yearly#thisYear" }
Number:Energy ConsoAnneeDerniere "Conso année dernière [%.0f %unit%]" <energy> { channel="linky:linky:linkyremotexxxx:yearly#lastYear" }

Number:Energy ConsoDay "Linky Conso Day -x Histo [%d]" <energy> { channel="linky:linky:linkyremotexxxx:daily#consumption" }
Number:Energy ConsoMonth "Linky Conso Month -x Histo [%d]" <energy> { channel="linky:linky:linkyremotexxxx:monthly#consumption" }

Number:Energy ConsoMonthHeuresPleines "Linky Conso Month Heures Pleines -x Histo [%d]" <energy> { channel="linky:linky:linkyremotexxxx:monthly#heuresPleines" }
Number:Energy ConsoMonthHeuresCreuses "Linky Conso Month Heures Creuses -x Histo [%d]" <energy> { channel="linky:linky:linkyremotexxxx:monthly#heuresCreuses" }

Number:Energy ConsoMonthHeuresCreusesBlanc "Linky Conso Month Heures Creuses Bleue -x Histo [%d]" <energy> { channel="linky:linky:linkyremotexxxx:monthly#blancHeuresCreuses" }
Number:Energy ConsoMonthHeuresCreusesBleue "Linky Conso Month Heures Creuses Blanc -x Histo [%d]" <energy> { channel="linky:linky:linkyremotexxxx:monthly#bleueHeuresCreuses" }
Number:Energy ConsoMonthHeuresCreusesRouge "Linky Conso Month Heures Rouge -x Histo [%d]" <energy> { channel="linky:linky:linkyremotexxxx:monthly#rougeHeuresCreuses" }

Number:Energy ConsoMonthHeuresPleinesBlanc "Linky Conso Month Heures Pleines Blanc -x Histo [%d]" <energy> { channel="linky:linky:linkyremotexxxx:monthly#blancHeuresPleines" }
Number:Energy ConsoMonthHeuresPleinesBleue "Linky Conso Month Heures Pleines Bleue -x Histo [%d]" <energy> { channel="linky:linky:linkyremotexxxx:monthly#bleueHeuresPleines" }
Number:Energy ConsoMonthHeuresPleinesRouge "Linky Conso Month Heures Pleines Rouge -x Histo [%d]" <energy> { channel="linky:linky:linkyremotexxxx:monthly#rougeHeuresPleines" }

Number Linky_Tempo "Linky Tempo Day [%s]" channel="linky:tempo-calendar:local:tempo-calendar#tempo-info-timeseries" }
# Displaying Information Graph
Using the timeseries channel and the binding version in openHAB 5.1.0, you will be able to easily create a chart to show the consumption graph. To do this, you need to enable a timeseries persistence framework. Graph definitions will look like this:

Sample code:
config:
  future: false
  label: Conso Day
  order: "110"
  period: 2W
  sidebar: true
slots:
  dataZoom:
    - component: oh-chart-datazoom
      config:
        type: inside
  grid:
    - component: oh-chart-grid
      config:
        containLabel: true
        includeLabels: true
        show: true
  legend:
    - component: oh-chart-legend
      config:
        bottom: 3
        type: scroll
  series:
    - component: oh-time-series
      config:
        areaStyle:
          opacity: 0.2
        gridIndex: 0
        item: ConsoDay
        label:
          formatter: =v=>Number.parseFloat(v.data[1]).toFixed(2) + " Kwh"
          position: inside
          show: true
        markLine:
          data:
            - type: average
        markPoint:
          data:
            - name: min
              type: min
            - name: max
              type: max
          label:
            backgroundColor: auto
        name: Consumption
        noBoundary: true
        noItemState: true
        service: influxdb
        type: bar
        xAxisIndex: 0
        yAxisIndex: 0
  tooltip:
    - component: oh-chart-tooltip
      config:
        confine: true
        smartFormatter: true
  xAxis:
    - component: oh-time-axis
      config:
        gridIndex: 0
        nameLocation: center
        splitNumber: 10
  yAxis:
    - component: oh-value-axis
      config:
        gridIndex: 0
        max: "150"
        min: "0"
        name: kWh
        nameLocation: center
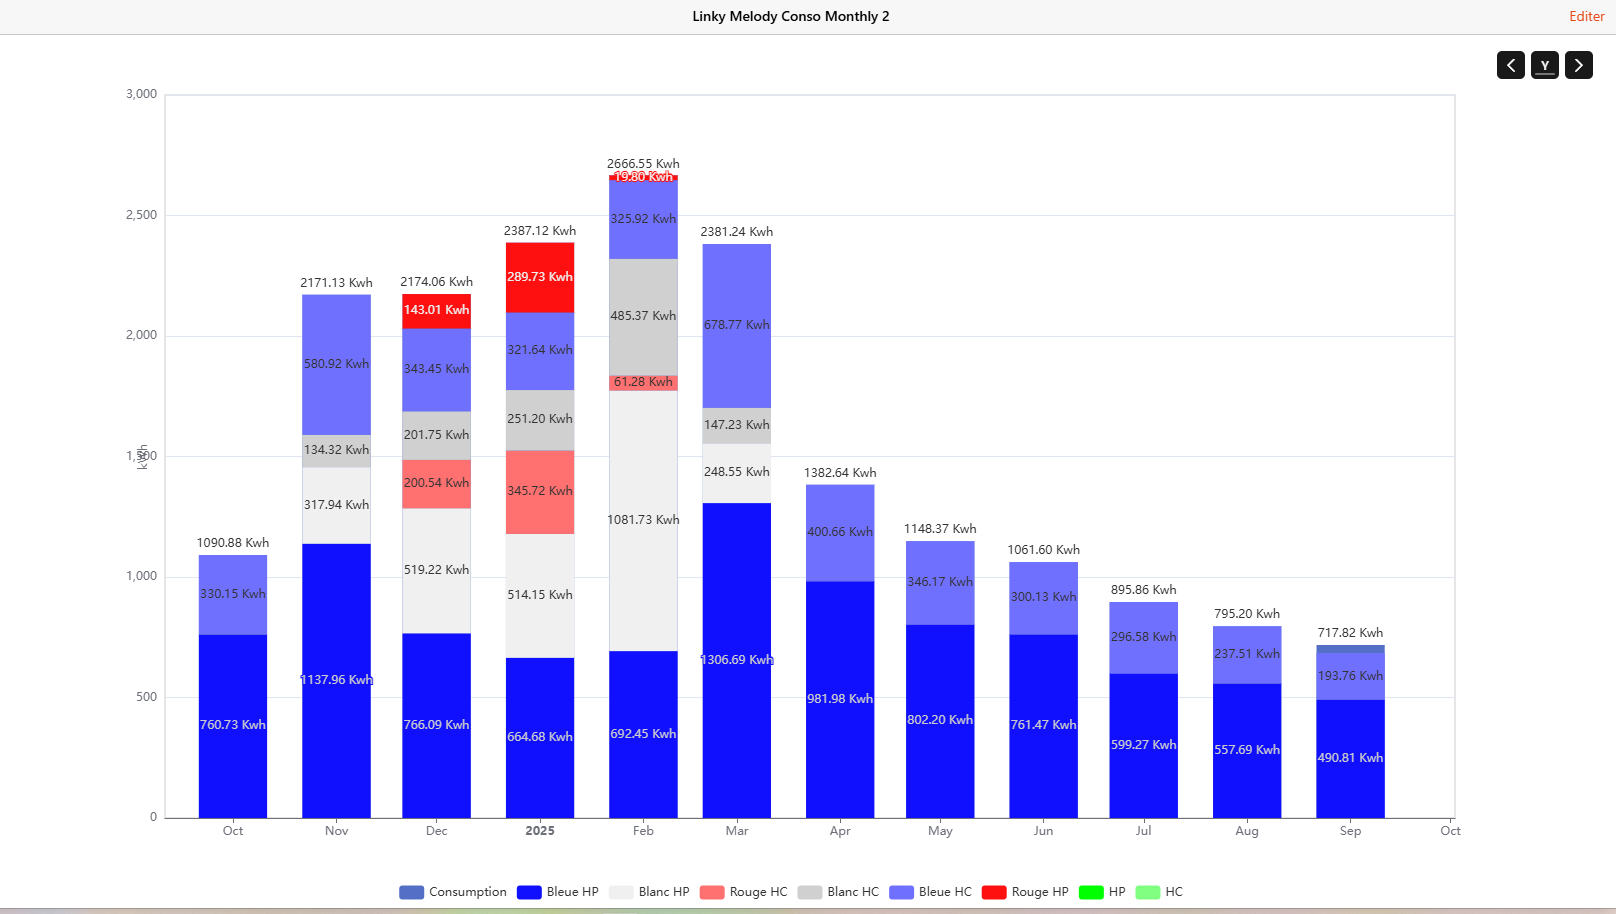
# Displaying Information Graph / New version with tariff
Using the timeseries channel and new version of the addons, you will be able to easily create a chart to show the consumption graph with tariff differentiation.
To do this, you need to enable a timeseries persistence framework. Graph definitions will look like this:
Sample code:
config:
  future: false
  label: ConsoMonth
  order: "9999999"
  period: Y
  sidebar: true
slots:
  dataZoom:
    - component: oh-chart-datazoom
      config:
        type: inside
  grid:
    - component: oh-chart-grid
      config:
        containLabel: true
        includeLabels: true
        show: true
  legend:
    - component: oh-chart-legend
      config:
        bottom: 3
        orient: horizontal
        show: true
        type: scroll
  series:
    - component: oh-time-series
      config:
        barGap: -100%
        gridIndex: 0
        item: ConsoMonth
        label:
          formatter: =v=>Number.parseFloat(v.data[1]).toFixed(2) + " Kwh"
          position: top
          show: true
        name: Consumption
        noBoundary: true
        noItemState: true
        service: inmemory
        type: bar
        xAxisIndex: 0
        yAxisIndex: 0
    - component: oh-time-series
      config:
        color: "#1010ff"
        gridIndex: 0
        item: ConsoMonthHeuresPleinesBleue
        label:
          formatter: =v=>v.data[1]!="0"?Number.parseFloat(v.data[1]).toFixed(2) + "
            Kwh":''
          position: inside
          show: true
        name: Bleue HP
        noBoundary: true
        noItemState: true
        service: inmemory
        stack: total
        type: bar
        xAxisIndex: 0
        yAxisIndex: 0
    - component: oh-time-series
      config:
        color: "#f0f0f0"
        emphasis:
          disabled: true
        gridIndex: 0
        item: ConsoMonthHeuresPleinesBlanc
        label:
          formatter: =v=>v.data[1]!="0"?Number.parseFloat(v.data[1]).toFixed(2) + "
            Kwh":''
          position: inside
          show: true
        name: Blanc HP
        noBoundary: true
        noItemState: true
        service: inmemory
        stack: total
        type: bar
        xAxisIndex: 0
        yAxisIndex: 0
    - component: oh-time-series
      config:
        color: "#ff7070"
        emphasis:
          disabled: true
        gridIndex: 0
        item: ConsoMonthHeuresCreusesRouge
        label:
          formatter: =v=>v.data[1]!="0"?Number.parseFloat(v.data[1]).toFixed(2) + "
            Kwh":''
          position: inside
          show: true
        name: Rouge HC
        noBoundary: true
        noItemState: true
        service: inmemory
        stack: total
        type: bar
        xAxisIndex: 0
        yAxisIndex: 0
    - component: oh-time-series
      config:
        color: "#d0d0d0"
        emphasis:
          disabled: true
        gridIndex: 0
        item: ConsoMonthHeuresCreusesBlanc
        label:
          formatter: =v=>v.data[1]!="0"?Number.parseFloat(v.data[1]).toFixed(2) + "
            Kwh":''
          position: inside
          show: true
        name: Blanc HC
        noBoundary: true
        noItemState: true
        service: inmemory
        stack: total
        type: bar
        xAxisIndex: 0
        yAxisIndex: 0
    - component: oh-time-series
      config:
        color: "#7070ff"
        emphasis:
          disabled: true
        gridIndex: 0
        item: ConsoMonthHeuresCreusesBleue
        label:
          formatter: =v=>v.data[1]!="0"?Number.parseFloat(v.data[1]).toFixed(2) + "
            Kwh":''
          position: inside
          show: true
        name: Bleue HC
        noBoundary: true
        noItemState: true
        service: inmemory
        stack: total
        type: bar
        xAxisIndex: 0
        yAxisIndex: 0
    - component: oh-time-series
      config:
        color: "#ff1010"
        emphasis:
          disabled: true
        gridIndex: 0
        item: ConsoMonthHeuresPleinesRouge
        label:
          formatter: =v=>v.data[1]!="0"?Number.parseFloat(v.data[1]).toFixed(2) + "
            Kwh":''
          position: inside
          show: true
        name: Rouge HP
        noBoundary: true
        noItemState: true
        service: inmemory
        stack: total
        type: bar
        xAxisIndex: 0
        yAxisIndex: 0
    - component: oh-time-series
      config:
        color: "#00ff00"
        emphasis:
          disabled: true
        gridIndex: 0
        item: ConsoMonthHeuresPleines
        label:
          formatter: =v=>v.data[1]!="0"?Number.parseFloat(v.data[1]).toFixed(2) + "
            Kwh":''
          position: inside
          show: true
        name: HP
        noBoundary: true
        noItemState: true
        service: inmemory
        stack: total
        type: bar
        xAxisIndex: 0
        yAxisIndex: 0
    - component: oh-time-series
      config:
        color: "#80ff80"
        emphasis:
          disabled: true
        gridIndex: 0
        item: ConsoMonthHeuresCreuses
        label:
          formatter: =v=>v.data[1]!="0"?Number.parseFloat(v.data[1]).toFixed(2) + "
            Kwh":''
          position: inside
          show: true
        name: HC
        noBoundary: true
        noItemState: true
        service: inmemory
        stack: total
        type: bar
        xAxisIndex: 0
        yAxisIndex: 0
  tooltip:
    - component: oh-chart-tooltip
      config:
        confine: true
        orient: vertical
        show: true
        smartFormatter: true
  visualMap: []
  xAxis:
    - component: oh-time-axis
      config:
        gridIndex: 0
        nameLocation: center
        splitNumber: 10
  yAxis:
    - component: oh-value-axis
      config:
        gridIndex: 0
        name: kWh
        nameLocation: center
# Getting Tempo Calendar Information
# Tempo Thing Channels
The tempo group will give information about the tempo day color link to a tempo contract
Channel ID Item Type Description linky-tempo-calendar#tempo-info-today tempo-value The tempo color for the current day linky-tempo-calendar#tempo-info-tomorrow tempo-value The tempo color for the tomorrow linky-tempo-calendar#tempo-info-timeseries tempo-value A timeseries channel that will expose full tempo information for one year
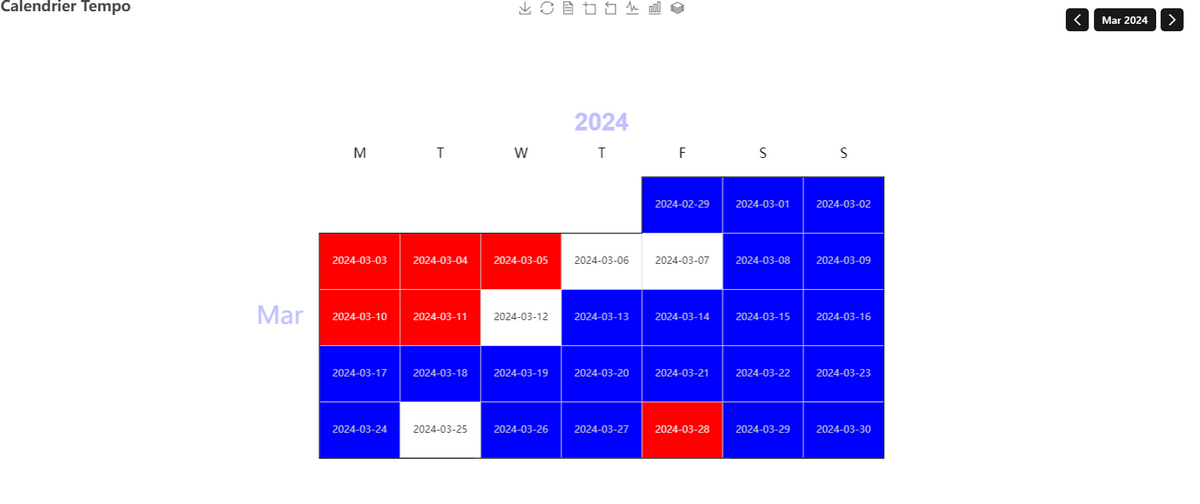
# Displaying Tempo Graph
Using the timeseries channel, you will be able to esealy create a calendar graph to show the tempo calendar. You will need for this to enable a timeseries persistence framework. Graph definitions will look like this
The resulting graph will look like this:
Sample code:
config:
  chartType: month
  future: false
  label: Tempo
  period: M
  sidebar: true
slots:
  calendar:
    - component: oh-calendar-axis
      config:
        cellSize: 10
        dayLabel:
          firstDay: 1
          fontSize: 16
          margin: 20
        left: center
        monthLabel:
          color: "#c0c0ff"
          fontSize: 30
          margin: 20
        orient: vertical
        top: middle
        yearLabel:
          color: "#c0c0ff"
          fontSize: 30
          margin: 50
  dataZoom:
    - component: oh-chart-datazoom
      config:
        orient: horizontal
        show: true
        type: slider
  grid: []
  legend:
    - component: oh-chart-legend
      config:
        show: false
  series:
    - component: oh-calendar-series
      config:
        aggregationFunction: average
        calendarIndex: 0
        coordinateSystem: calendar
        item: Linky_Tempo
        label:
          formatter: =v=> JSON.stringify(v.data[0]).substring(1,11)
          show: true
          smartFormatter: false
        name: Series 1
        service: inmemory
        type: heatmap
  title:
    - component: oh-chart-title
      config:
        show: true
        text: Calendrier Tempo
  toolbox:
    - component: oh-chart-toolbox
      config:
        presetFeatures:
          - saveAsImage
          - restore
          - dataView
          - dataZoom
          - magicType
        show: true
  tooltip:
    - component: oh-chart-tooltip
      config:
        formatter: "{c}"
        show: true
  visualMap:
    - component: oh-chart-visualmap
      config:
        bottom: 0
        calculable: true
        inRange:
          color:
            - "#0000ff"
            - "#ffffff"
            - "#ff0000"
        left: center
        max: 2
        min: 0
        orient: horizontal
        presetPalette: ""
        show: false
        type: continuous
  xAxis: []
  yAxis: []
# Console Commands
The binding provides one specific command you can use in the console.
Enter the command openhab:linky to get the usage.
openhab:linky <thingUID> report <start day> <end day> [<separator>] - report daily consumptions between two dates
The command report reports in the console the daily consumptions between two dates.
If no dates are provided, the last 7 are considered by default.
Start and end day are formatted yyyy-mm-dd.
Here is an example of command you can run: openhab:linky linky:linky:local report 2020-11-15 2020-12-15.
# Docker Specifics
In case you are running openHAB inside Docker, the binding will work only if you set the environment variable CRYPTO_POLICY to the value "unlimited", read the documentation (opens new window) for details.
← LinkTap Linux Input →